Vintage

Showing posts with label thrifty. Show all posts

Wednesday, July 18, 2012

Budgeting 101: To Market, To Market

Well so much for being consistent about blogging. A month and a half later here I am back again. Truth be told, life caught up with me a bit. The Bear got bronchitis (major ugh!), work got a little hectic, we celebrated year 4 of married life, and let's face it the energy level is ever decreasing as I near the birth of baby #2. That said, I am here to deliver my shopping plan as promised.

Step 1: Take Inventory
Probably the most important step is to know what you have in your stash and what basics you're running low on. My basics are things like coffee, crackers, cheese, flour, sugar, rice, pasta, canned soup (tomato, cream of chicken and mushroom), canned veggies and beans, potatoes, as well as paper goods (TP & paper towels). Things of that nature. These are things my family uses a lot of and so I make sure we have it all in the house. After the basics I take inventory of our meat. Know what you've got to work with.

Step 2: Plan Your Meals for the Week
1. Take into consideration what you already have in stock before you start looking at what you need to buy. If you are really trying to save money, also look at what you can substitute in recipes. For example this very evening I substituted a can of green chiles for a few chopped jalapeno slices in my chili recipe.
2. When it comes to planning meals, find a balance of proteins and get creative with them. Let's face it, unless it's majorly on sale, beef is really not an affordable option, even ground. We stick with whole chicken (it can go a long way), pork when on sale, beans (pick a night to go all veg), and fish. I try not to have the same protein more than two meals in a row just to keep the variety going.
3. Shop the ads. I'll be honest, I don't really do this but I have been blessed by Aldi where I don't necessarily have to shop ads because their prices are already lower than most brands on sale. That said, I don't buy meat from them (solution added is not okay in my house). So in the way of meat, shop the ads. And fresh produce, buy on sale and in season!

Here's an example of a weekly meal plan I did. Hopefully in the near future I can post the recipes.

Monday: Roasted Chicken & Greek Potatoes w/Green Beans
Tuesday: Southwest Veggie Bake (lots of beans) & Salad
Wednesday: Honey Garlic Pork Chops w/Broccoli and Baked Potatoes
Thursday: Chicken Lo Mien & Crab Rangoons
Friday: Mushroom Steak (using cube steaks) w/Green Beans & Mashed Potatoes

We are a family of 3 and yes my toddler eats like an adult so I count him. I usually make enough for 4-5 servings so that there is a little left over the next day for lunches.

Step 3: Make Your Shopping List
Now that you've got your meal plan and know what you have in house. Make your list. The key to this is being detailed. I shop two stores: Wal-Mart & Aldi. I know these stores and where everything is. I make my list according to the store's layout. At Wal-Mart I start at the back and work my way up. Aldi you walk in and end at the check out. Making your list to suit your store is important for a few reasons. First, it saves you the time and frustration of going back and forth and up and down a bunch of aisles as you realize you've missed something on your list. *Disclaimer: this still happens to me as I sometimes skip over things even when they are in order on the list.* Second, it saves you from going down aisles you don't need to go down and being tempted to purchase things not on your list.

Step 4: Go Shopping!
Normally, a woman loves to go shopping, but let's face it grocery shopping is tedious. Having the list makes things so much easier and more efficient. There are two major tips: 1. Stick to the list & 2. Write down the price of each item. This second step is super important when it comes to the budget aspect. When I write down the price I over estimate to the next half dollar. Actual price, $3.15; Written price $3.50. This helps take into account tax. I like to add as I go so I know where I am budget-wise and know what to expect when I get to the register. Sometimes the prices will ring up different from what you estimate. Don't be afraid to double check on stuff if it rings up more than you wrote down.

Okay, I think that's it. Probably not as detailed as I could have been and may not even be that helpful, but I got it out there.
Forewarning, next post will probably be baby related. I'm thinking 'What's in my bag, hospital addition' and probably my amazing recipe for postpartum care.

Monday, June 4, 2012

Budget 101: The Cardinal Rules of Grocery Budgeting


To really get your grocery budget in check, you’ve got to follow a few cardinal rules.

1.  Embrace the generosity of others.

    This is probably the most difficult but the most important rule of all. There is a fine line between enjoying the generosity and taking advantage of it. Every family’s version of this is different. For us it includes participating in WIC. If you are unfamiliar, WIC is a fantastic government-sponsored program for families with young children that provides very basic groceries such as milk, cheese, bread, cereal, beans, and an allotment of fruits and veggies based on financial need. Truth be told this is the biggest source of help when it comes to our overall grocery budget. WIC provides at least another $100 a month to our groceries. It took me a little bit to get over the stereotype I had associated with WIC, but putting my own pride aside, I did what was needed for my family.
    Aside from the generosity of taxpayers, we have also learned to embrace those families who love us enough to share a bit of their blessings with us. If someone invites you over for Sunday lunch, accept graciously and always offer to bring something. If you have a friend who happens to slaughter a cow or have lots of venison left from hunting season and offers you some meat, open up that freezer and allow them to share the wealth. And of course, if your loving parents or in-laws ask how they can help, tell them they can take you to the grocery store.
    Husband and I look forward to the day that we too can pour out our blessings on others, but for now we are the ones receiving the blessings from others. Now on to the other ‘rules.’

2.  Set your budget and stick to it.

    Take a hard look at your finances and see what your average spending for groceries and toiletries have been over the last 6 months. See what you specifically spend on meats, produce, dairy, and dry goods. If possible also look at what meals you prepare on a regular basis. This will help tremendously when you move on to other steps. Now set your budget. Again every family is different, some spend more, some less. We stick to an average of $50 a week. Some weeks are more, some less. Knowing your budget and sticking to it strictly is the key.

3.  Shop with cash.

    This has truly been the money saving tip of the century. Every two weeks I visit the bank and take out the grocery money for those two weeks. When I go to the store I know that that’s all the money I have for two weeks. If the money runs out, I don’t by anything else. When you have that cash in hand it makes you much more aware of how much you spend.
4.  Shop with a plan and a purpose.

    Before I even think about going to the store, I make a plan. I know what stores I will go to, what meals I will make that week, and exactly what I am going to buy. I’ll go into more detail about the planning stages in another post. Basically, in making a plan you can save yourself time and money.

That’s the basics of it all. It sounds so simple and yes, it is once you get the hang of it all. Next post I’ll share how I do my shopping plan. Enjoy your first full week of June!

Friday, June 1, 2012

Budget 101: The Basics

Look at me two posts in 1 week. Woohoo! So if you are part of the privileged class known as our friends and family, you know that we have always been on a tight budget and now with both of us only working part time the budget is even tighter.

In an attempt to get some creative ideas for our budget I started looking around the world wide web for ideas. Lo and behold my idea of a strict budget varies greatly from the general population. I feel like we live on the bare necessities but I guess you can be the judge of that. Without going into too many details, here's the general scheme of our monthly budget.

Essentials (aka bills we can't really change)
$500  Rent
$400  Health Insurance (it super sucks having to pay for your own insurance)
$128  Car Insurance (trying to get creative with our agent to get this lower)
$200  Student Loans (only 6 more years to go!!)
$180  Car Loan (only 20 easy payments left)
$272  Tithe (give to God what is God's, pre-taxes of course)
$200  All Utilities (this is the top budgeted, we have yet to actually spend this much monthly)

Extras (aka stuff we need and yet don't need)
$139 Cell Phones (ugh! why does it cost so much?! trying to figure out a way we can get this lowered)
$24   Internet (yes, we need it. How else would I get to blog?)

Grocery & Gas (the most creative section of budgeting)
$200  Groceries (yeah you read that right, $200 a month = $50 a week)
$100  Gas (this has been the most difficult and the one we fudge on the most) 

That brings us to a grand total of $2343/month. When I add it all up is sounds like so much but I guess in comparison to others it's not so bad. I won't go into the detail of saying how much we actually bring home (I gotta keep something private!), but let's just say there's not much left for fun and games. Oh, by the way, the grocery budget also includes any toiletries we might need to get. That money doesn't just appear out of thin air. With what is left over every month, we set it aside for things like oil changes, insurance co-pays, and a little bit of cushion.

So there you have it, that's the budget. The funny thing is, out of all the money we spend every month there's only a few hundred dollars worth that we actually have real control over. Since that is the case over the next few posts I hope to focus in on one particular area: groceries. It's the one with which most people struggle (notice my amazing grammar there?) and it's the one with which I've had the hardest time finding help via the internet. 

Tune in next week for some general tips on sticking to a small grocery budget.

Have a wonderful weekend!!
Husband, the Bear, and Brother at Run Ruckus (from back in March but I'm still pretty proud)


Wednesday, May 30, 2012

1st Birthday on a Budget: Part 2


Wow, I am really bad at this blogging thing! But hey, working and raising a family is hard work and let's face it, blogging isn't exactly top priority. That said, here's the rest of the Bear's 1st birthday.

Step 3: Pick a Menu ($30) & Make a Cake ($8)

Since we did a Razorback themed party we opted for game day food including hot dogs, beans, salad, and chips and dip. Not the healthiest of menus but hey it's a party. The key to food at a party is to keep it simple, inexpensive, and of course have the grandparents chip in a little. They kicked in a little when it came to the sides and we handled the rest. Super easy and cheap.

When it came to the cake, I tried to be ambitious and make one from scratch. Who knew that cake is next to impossible to get out of a custom cake pan without cake release? Not me. The first version failed miserably so I did what every good mom does and bought a mix ($2). The most expensive part of the cake ended up being the icing. I purchased a tub of plain white ($1) thinking I would get off cheap but lo and behold to get a quality red coloring I had to go to the cake decorating section. Let's here it for $5 for a small canister of crimson food gel. I know it's probably horrible for us and will someday give us cancer but I used it anyway. So now we are to a grand total of $8 for the cake. I guess in comparison to a store bought cake it's no big but it was more than I had expected.
Finished cake w/decorations (His name was across the top, again removed for privacy)

Step 4: Favors ($7)

For favors I opted for cookies and mints. The mints I had left over from a shower so they were free! For the cookies I borrowed some cookie cutters from my mother-in-law that were jersey and football shapes. I spent my $7 on the baking supplies, frosting (which I homemade), and the dye ($4). I had some red from the cake but had to buy the brown for the footballs. Again, good food dye is expensive.
I found the key to good cut out cookies is to cut them again after they bake. This gives you clean lines when you decorate and you get to munch on the crusts!
Fresh baked sugar cookie

Place cookie cutter over cookie and give one firm press

Result is clean cut cookies
The finished product (sorry I didn't get a pic of them decorated outside the bag)


Step 5: Presents ($40)

I feel like deciding on a gift is always the difficult thing. Do you go one big gift, several small, consider the party itself a gift and let the grandparents handle toys? Because it was so close to Christmas we opted to go very simple on gift. One gift for birthday and one gift for Christmas. The Christmas gift I snagged for $10 so that left us a little more to spend on birthday. While perusing the aisles at Target we came across this little darling and knew it was perfect for our little Bear.
Awesome Little People Batcave

So there you have it. 1st Birthday party for just under $100. 
Let's review shall we: Free (decor & cute outfit) +  $11 (invites) + $30 (Food) + $8 (Cake) + $7 (Favors) + $40 (Present) = $96

Wednesday, March 21, 2012

1st Birthday on a Budget Part 1

I realize that this post is more than 3 months overdue but hey a lot has transpired. We moved, Husband got a new job, I got a new job, Bear had a birthday, and we're expecting again. So there is a little slack to be cut.

So the Bear turned 1 a few months ago and did so on a very tight budget. Like most young families, we don't have an abundance of funds and that didn't miraculously change when the Bear's 1st birthday rolled around. We had to really think about what we wanted to do and how much we wanted to spend.

I started mapping this out and discovered that it was way to long for one post so I'll break it down into two. Part 1: Planning/Prep and Part 2: Party

So here are the guide so to speak of how I kept my son's birthday from start to finish for under $100.

Step 1: The Theme/Decor (Free)
I started planning my son's party while I was still pregnant. Call me crazy but doing so saved me some serious dollars when it came to the party. How so you may ask?
I saved the decorations from the baby showers!
We did an Arkansas Razorback themed nursery and so two of my showers were also Razorback themed. I saved napkins, streamers, wall hangings, stickers, plates, etc. Yes they took up a little closet space and yes my husband tried to throw things away a few times, but I hung on to it all! I also borrowed some decorations from the Bear's nursery and set out his baby book, photo albums, etc.


I didn't have to buy a single decoration and the space looked great.
Cute baby stuff

Banner from one of my showers

Pictures of the Bear over the last year
 

Step 2: The Invite List (Free) and Invitations ($11)

I know the tendency of 1st timers is to go overboard with the first birthday. Hey, I was in the same boat. If I could have, I would have gone all out and probably tried to get Tyler Wilson himself to come to the Bear's party (wouldn't that have been awesome)! But, again, reality set in.
Rather than inviting everyone we knew with kids, people from church, and every family member we could find, we kept it to our immediate family and a few close friends with kids.
I made the invites using a combo of stuff I already had and a few simple purchases
  • Wrapping paper from a shower
  • Brown scrapbook paper
  • "You're Invited" rubber stamp ($6 from Hobby Lobby)
  • 12 pk. of red envelopes ($3 from Hobby Lobby)
  • 12 printed pics of the Bear ($2 from Wal-Mart)
Here's the finished product. Not bad, eh? (The blackouts were obviously not on the actual invite, just personal stuff blocked for this post.)


Step 3: Super Cute Outfit for the Birthday Boy
Just like every mom I wanted by Bear to have a cute out fit to wear. Something that had a "1" or "Birthday Boy" or something similar on it. Truth be told I couldn't find exactly what I was looking for so I just made it myself. I am not a master seamstress so I assure you anyone can do this. I took a white onesie we already had and some material that was left over from covering a footstool in the nursery.
I cut out a one and zig-zag stitched around the edge. Done!


That's it for now. Still to come are The Food/Cake, The Favors, and The Presents.

I'm glad to be back in the blogging world after my brief hiatus.

Thursday, December 1, 2011

Brown Paper Packages

Growing up, the Sound of Music was my absolute favorite musical and of course one of the best songs is "My Favorite Things." Oh the wonderful things that come wrapped in brown paper and string. Okay, most things now-a-days don't come wrapped in brown paper. They come in bright wrapping paper, cellophane, and bags with balloons. But not this year at our house! We're kickin' it old school!

My first married Christmas I got creative and used newspaper and cloth ribbon for wrapping paper, but got busy and less creative the next two years. This year I decided not only would I get creative but also resourceful. Most of the grocery stores around here give you paper bags at the checkout. I had been saving them to reuse but then a light bulb went off. Ding! Use them for wrapping paper. Genius I know! So for the past few months I've been saving my paper bags and with all my Christmas shopping done (yeah, you heard me, done), I started wrapping today.

Let's go through this process together.

Step 1: Dismantle the bag. First remove the handles. You'll use these later for bows.

Then carefully take the bag apart at the seams. I chose to do this to save every scrap I could but you can also just cut it apart. No big.
Step 2: Lay it out and wrap up your gift. I highly suggest either turning your edges under so no rough edges or you could just trim up the edges.

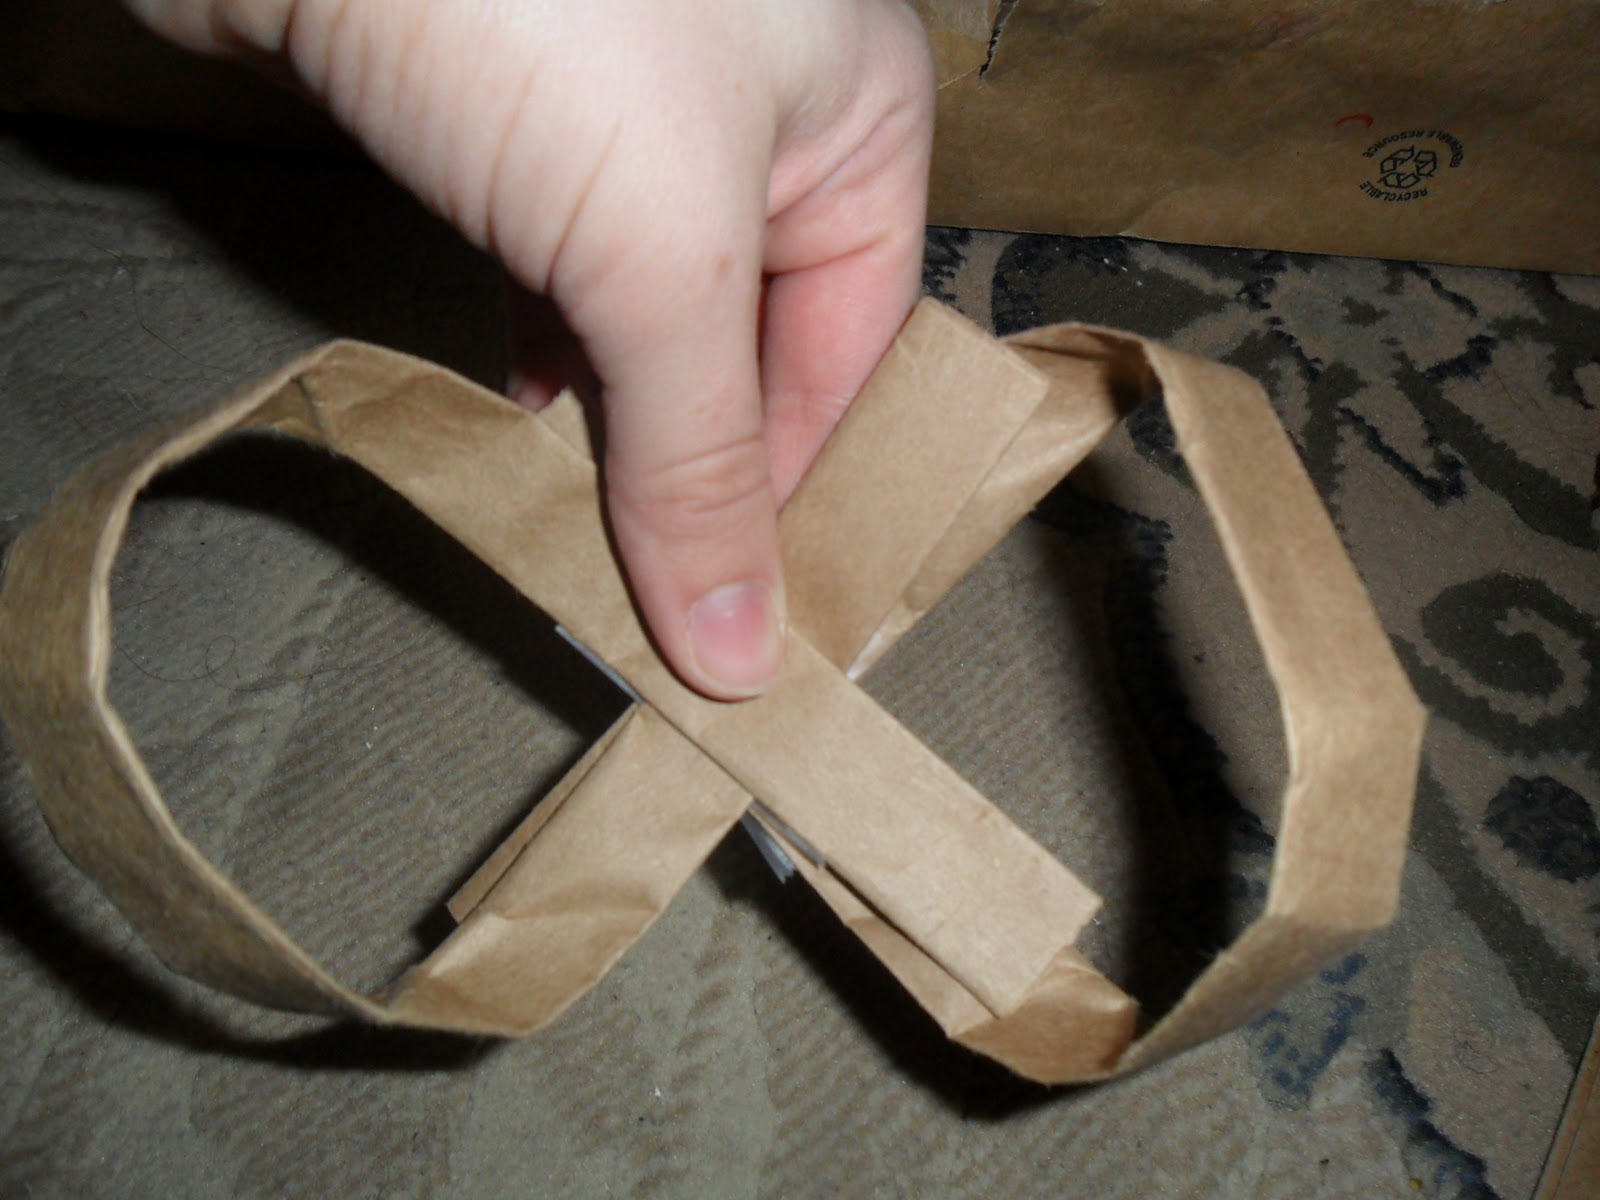
Step 3: Make the bow. Take one of the handles and bend it the opposite direction that it was on the bag. This creates a loop. You'll need to smooth it out slightly.


Next place a piece of tape on the back side of the bow so that it doesn't show.
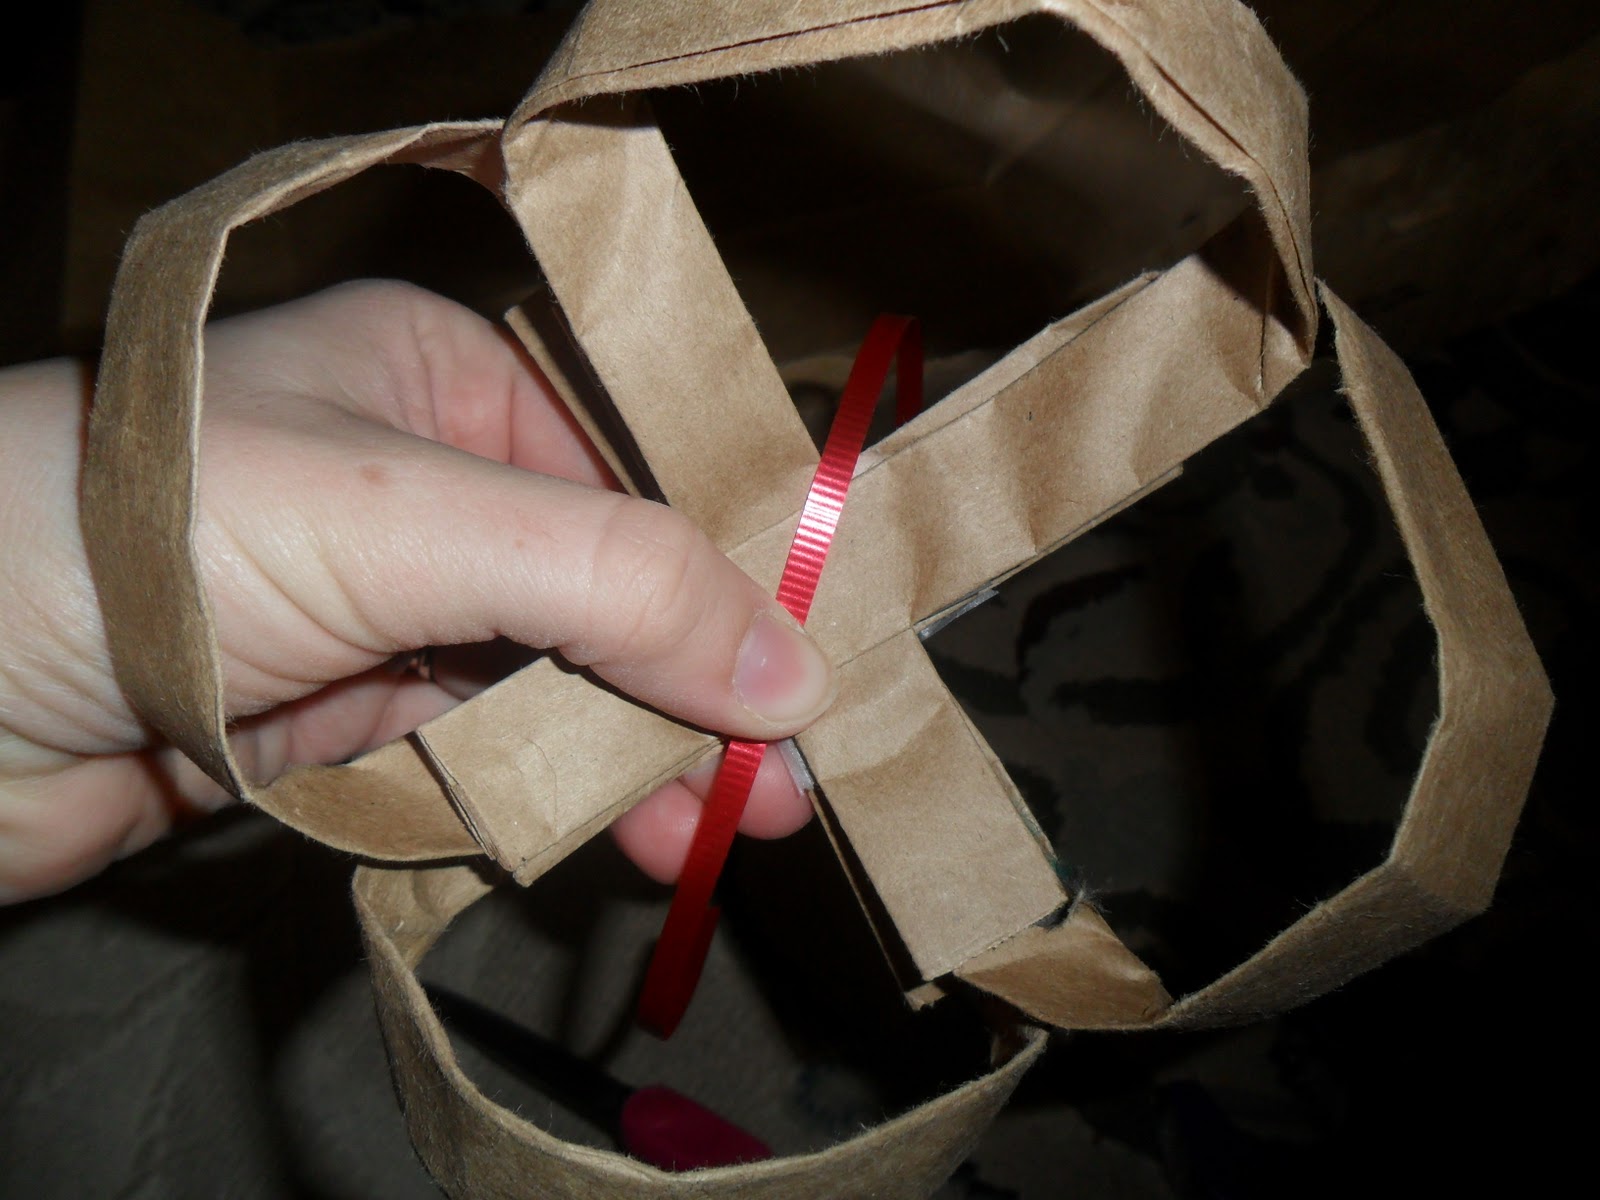
Now repeat this with the other handles. You can add as many as you like to your "bow cluster."


I chose to use four "bows." To secure them together, I took a small red ribbon and tied it around all of the bows.


Now all there is left to do is fancy up the bow a bit and attach to the wrapped package.

Step 4: Enjoy brown paper packages tied up with string!


All in all I'm fairly pleased with the outcome. If I had it, I would use wider ribbon to cover up the tape on the sides or better yet use the clear tape designed not to show.

I know it's early, but I'm glad I have my packages wrapped and under the tree. With the bear's birthday next week, I have to be on the ball with things so it will be smooth sailing until Christmas.

Check out my husband's lovely gift wrapping!
It's moose...or a reindeer...I'm not sure.

Friday, September 16, 2011

Comfort Food Series: Chicken and Dumplings

So to keep myself motivated to blog bi-weekly if not more frequently, I decided to do a series. And what better thing to write about than food, comfort food!

To start I wanted to do my favorite comfort food: chicken and dumplings. I think everyone has their own variation of this recipe and it's always "the way mom made it." So for me this is the way my mom made and my grandma taught her to make it. It's quite the legacy so you should feel honored that I am sharing this time-honored recipe with the public.

The way my mom cooks is by touch and feel and if she actually has a written recipe, the actual product is probably some variation. This recipe is one that is not written down or at least I sure have never seen a written copy. So again feel honored that you get a written copy!
Here it is my version of Chicken and Dumplings.


What you need:
Leftover whole chicken (still on bones) or 4-6 chicken thighs (raw or cooked)
3-4 cubes chicken bouillon
1 1/2-2 quarts water
Flour
shortening or fat from chicken broth (preferred)
warm chicken broth
salt and pepper to taste

What you do:
There are a few ways to make your broth.
1. Raw chicken: Cook chicken in water with bouillon in crock pot on low all day. Feel free to add your own extra spices such as salt, pepper, fresh or powdered onion. At the end of the day, remove all chicken (meat and bones) from broth and set aside. Run broth through fat separator or something that will remove any bits of bones/meat and allow broth to sink and fat to rise. Leave in fat separator or put in another container. Refrigerate overnight to allow broth sink and fat to harden. Meanwhile, let chicken cool enough to handle. Separate chicken from bones and store chicken. All this can be done same day if desired.
2. Leftover cooked chicken (my preferred method): Using leftover baked chicken, remove as much meat from the bones as possible without completely dismantling the chicken. Place chicken in large stock pot and cover with water. Add bouillon. Cover and let simmer for 2-3 hours until chicken and bones separate. Remove meat and bones from broth. Run broth through fat separator and remove usable meat from bones. No need to store broth if using right away.
*If you don't want the hassle of making your own broth simply buy ready to eat chicken and canned broth.

Now that you have both broth and chicken, get to work on the dumplings.
Boil broth in large pot. Broth needs to be a full rolling boil before adding dumplings.
Dump about 1 c. flour in a mixing bowl. (1 c. of flour makes about 6 servings of dumplings) Cut in shortening or chicken fat from top of broth and make a course crumble. (Using the chicken fat instead of shortening gives the dumplings more flavor and you use all of your resources). Add enough warm broth to form a soft, elastic dough. Dough will be fairly sticky. Put half of dough on lightly floured surface. Need very gently so that dough maintains elasticity and softness. Roll out thin into rectangle.

Using a butter knife, cut into 1" strips. 

Cut in half.
Gently take strip. Stretch slightly and drop into boiling pot of broth.
Repeat with other half of dough. Let dumplings cook 5-7 minutes in boiling broth.
To thicken your "sauce" take about 1/4 cup of broth from the pot and whisk in 1/4-1/2 c. flour depending on how thick you want it and how much liquid you have. Return mixture to pot and allow to cook over medium heat. Be careful not to keep on too high of heat or dumplings will stick. Cook until desired thickness.

And that's it. This was surprisingly harder to put on 'paper' than I anticipated. Chicken and dumplings is one of those recipes I grew up making and I've never really thought about how to actually do it. I really hope I haven't missed any steps!


*Next post: Hamburgers with homemade buns!

Friday, July 29, 2011

It's 'Sew' On!

So if you know anything about me, and let's face it most of my readers are close friends and family, so you do, I look forward to this time of year almost as much as Christmas. What time of year is that you may ask? Um...Project Runway season!! I've been hooked for several seasons now and I just can't help but love every minute of it. My dearest thinks I'm slightly crazy (but secretly I think he likes it too), but every year he lets me indulge in the glory that is the Runway. I love the crazy wanna-be and semi-professional designers, the ridiculous challenges, and of course the drama, drama, drama. 
For many seasons I've wanted to do my own version of PR. Of course I had wanted to do it with a few of my friends and have a fantastic challenge to end at fashion week. But since I'm still a little lonely in the south (miss you KC girls and Michelle!), I must embark on this journey on my own. So the challenge I have set before me is this:
Yes I'm planning on making two dresses in two months (as well as a couple of pillow cases). I've been wanting to make my own dresses for a while and I thought what better time than now. Not only am I making the dresses, but I'm making the patterns. They aren't original (modeled after two dresses I already have), but it's still a challenge. Here's what I'm working with.


In case it needs explanation, the red dress will use the floral fabric and the plaid dress goes uses the plaid fabric. We'll see how it goes. I'm by no means a master seamstress, but I'm going to give it the old college try. 
Just to make sure I don't feel like a total failure if the dresses don't go well, I'm also doing pillow cases.

 So that's the plan. We'll see how it goes. I'll try to keep you posted on my progress and hopefully in two months I will have two pillow cases and two dresses. Wish me luck!

Saturday, July 2, 2011

DIY Dishwasher Soap update

Well I finally got around to actually trying my homemade dishwasher soap and the verdict is...
It worked great!
I put a heaping tablespoon in my soap dispenser and ran the dishwasher like normal. I was a little skeptical since I had heard other people's recipes didn't always come out great, but this particular concoction did just fine. 
In case you missed it, here's the recipe.
1 c. Borax
1 c. Baking Soda
1/2 c. Citric Acid
1/2 c. Kosher or Sea Salt
Use vinegar as your rinse agent.
Combine all ingredients in an airtight jar, shake up, and seal.

That's it!

Monday, May 23, 2011

Homemade Dishwasher Soap

This whole keeping up with the blog thing is hard! Oh well.
Lately I've been trying to do as many DIY cleaners as I can. I adapted this recipe for laundry soap. It's super easy: 1 c. Borax, 1 c. Baking Soda, 1 bar pure soap. I use 1 heaping tablespoon full per normal load. The original recipe uses washing soda but I could only find baking soda. Also I did a little research and found out that washing soda is more caustic than baking soda. Basically it is an 11 on the pH scale, just short of being considered toxic. Even though fumes are not harmful, extra measure should be taken when handling it. This article was very helpful. Also I used Ivory as my soap simply because it is dirt cheap.

So after being inspired to make my own laundry soap I decided to find a homemade dishwasher soap. Dishwasher soap can get expensive and a lot of them contain chlorine bleach that can discolor clothing and wear down on dishes. After searching, this is the recipe I found.

1 c. Borax
1 c. Washing soda (or baking soda)
1/2 c. Citric Acid (found in the home canning aisle)
1/2 c. Kosher salt (or sea salt)
The borax and soda are obviously your cleaners. The citric acid helps keep the dishes from getting cloudy. I also read you can use unsweetened lemonade instead, but I haven't tried it. And lastly the salt is your scrubber. The more coarse the salt the more scrub. I only have sea salt at the moment and should be fine. You can also use vinegar as your rinse agent.

Truth be told I haven't used it yet. I'm still using up a bottle of store bought detergent, but as soon as it's out I'll be using this. From what I've read it's a good recipe. I'll repost with first hand results later.

Friday, April 29, 2011

Couponing update

I've been at it for a week and haven't really used my coupons much but I'm getting there. Last week I did some much needed prep work. I searched for or requested the coupon policies of all the stores I shop at including Wal-Mart, Walgreens, Harps, and CV's. Wal-Mart had their policy posted online but the other three I had to email to get but they were all quick to respond. From what I have researched one of the most essential parts of couponing is knowing the policies of the stores you frequent.
Armed with that, I set out to do my first super couponing. I opted for the small victory of buying anti-bacterial wipes. Walgreens had a sale for Lysol wipes. Here's the breakdown: Lysol wipes are usually 2/$5, with an in-store coupon they were 2/$3, I had a coupon for -$1/2 and a register rewards coupon for -$3, and I bought all they had in stock (3). After my deductions and coupons I came away with 3 containers for $1.19. Not exactly an extreme coupon moment, but I figure getting 3 for less than the price of one is a good start. I'll keep everyone posted on future successes.
On another budget note, I came in $40 under for my food budget for the month and was able to use that $40 to get a few items for the whole family from Old Navy. Let's hear it for good budgeting!

Sunday, April 17, 2011

The Quest to Coupon

So my new addiction is TLC's Extreme Couponing. If you have yet to experience the wonder it's a show about these moms who are the queens of couponing. I'm not talking saving a few cents here and there. These women literally gets hundreds of dollars worth of groceries for $5. One mom was featured on Rachael Ray and got $6 back from the store. Amazing!
So while I may have lofty ambitions, I set my actual standards much lower. I am starting my own version of extreme couponing. I bought 2 Sunday papers (one of the moms suggests a paper per person at home) to get double the coupons. This week I plan to clip and organize. The idea is you try to double up on coupons and match store sales and store coupons. This way you get the most off you can. I'll also be clipping coupons online from coupons.com and consulting the Krazy Coupon Lady.
My husband gives me a month to get started. He claims I'll give up after that. I say 'we'll see.' I don't anticipate that I'll be like these ladies overnight, but I do hope that I can at least get my foot in the proverbial door.
Wish me luck and I'll check back with you in a month!